Build a Music PC - XP2000 - super-cheap!! [pt6]
Ask a question about this subject?
Post a question direct to our forums and get mailed when a reply is added!
There are 2 viewer comments posted to this page - Read
Author: admin
Date: 10-Apr-03
Build a budget 2000 Athlon XP music PC - Page 6 - Final tweaks & thoughts.
Well, that's the build... Don't rush in and install your soundcard just yet tho - read this WHOLE page/section first -
1. We need to do a few more things to tweak the BIOS, which can be done before or after installing our soundcard & music s/w... BUT, we need to do one thing BEFORE installing our audio card & music s/w... Then on top of that, there is the various OS tweaks we can do for either 98/SE or XP - again, those OS tweaks can be done AFTER installing the soundcard & OS... So read this whole page/section to see what else needs to be done - Personaly, I'd recommend doing all these tweaks PRIOR to adding the audio card & music s/w, but don't sweat it!... we can adjust these tweaks or reverse them afterwards at anytime...
2. We have installed our OS on the first created C: partition - We still have our other partitions we created which have NOT been formatted yet - This is fine... When we installed XP the install included disc formatting, and we selected FAT32 format - This format will have been done using default FAT32 4kb clusters... When we come to format our other partitions which we'll use for our work-disk area, and sample storage area and backup/audio area, we'll want to use a special format using larger cluster sizes to reduce disc read/write actions... More on that later... For now we have ONLY our primary C: partition formatted and our WIN XP is installed on that partition.... That's all we need now to fully configure our PC and add our soundcard & music s/ware...
Now read on!...
I have spent some time with XP recently since the build over the autumn/winter 2002-jan/feb 2003 period, and have now upgraded most of my network to XP, leaving a couple of 98SE machines for certain tasks.
This PC was initialy setup and run for 4-5 months with Win98SE. When running 98SE the BIOS was set to 'default' for the 98SE OS install, but with 'NON P&P OS' selected so as I was able to assign a BIOS set IRQ manualy for the soundcard slot... Also, all USB & all other ports not being used were disabled in BIOS. - ACPI was ON as noted, and appears in CONTROL PANEL/SYSTEM sharing irq5 with the soundcard in SLOT3/IRQ5 - (ST-AUDIO C-PORT SYSTEM with the older DSP24/96 MK1 card) - However, no performance problems were encountered with APIC switched ON and sharing the soundcards IRQ.
Working with 98SE in this 'NON P&P OS' manual-BIOS setting way, I was able to enter the bios and manualy change slot-3's IRQ (the soundcard slot) anytime.... 98 was about as stable as it usualy is, which meant some crashes from time to time, but overall the machine was as stable as you'd get from a 98 based box, and functioned fine for about 4-5 months as a 98SE box. We used it for a remix or two, and RnB track, recording about 7 or 8 rock song demo's for an artist/writer, and for 3 film scores, including one for NBC... All in all it was fine.
The only other things we did was install all the VIA 4:1 driver patches, set the hard-drives to DMA 'enabled' & fix the swapfile at 200mb min/max - nothing else was done at all apart from BIOS tweaks to set the speed for 2700 ram.... Win98se was installed and tweaked with a 'typical' setup... eveything pretty standard and simple.
So basicaly, I'd say if at all possible, use Win XP - Because it's a REAL operating system, not a crappy DOS gui overlay like WIN 9X, and XP is very stable... Since I started using XP exclusively for my work machines, the dreaded 'Blue-Screen of Death' is a thing of the past... No more lockup's ever.... XP might use a tad more resources, but it's the way to go to my mind 100%...
So... You decide which OS to use... Ok - so let's say we have installed our OS, (98 or XP) - We now need to re-enter the BIOS to make final tweaks to set the ram speed etc - We also need to install our VIA driver 4:1 patch, then we are ready to tweak the OS to smooth things a bit further and with those tasks completed, we are all done and ready to install our soundcard... So let's get all that done, starting with the final BIOS tweaks for setting the ram & bus speed....
FINAL STEPS - BIOS - RESET BOOT SEQUENCE
Remember how we changed our Boot sequence in the BIOS so that the PC would seek the CD-Rom first and detect the Win XP Disc?... Ok.. Now Windows is installed we need to first reset the boot sequence so that our computer boots from the primary C: hard-drive first and starts Windows....
FINAL STEPS - LAST BIOS TWEAKS - CPU/MEMORY RATIO
Ok - we installed the OS with the BIOS settings for the cpu/ram/bus speed set to AUTO. - Now the OS is installed, we need to tweak or settings for 2700 ram...
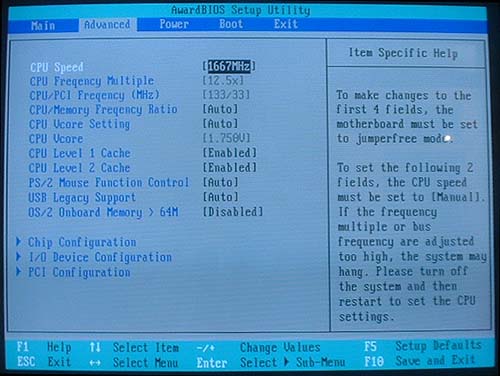
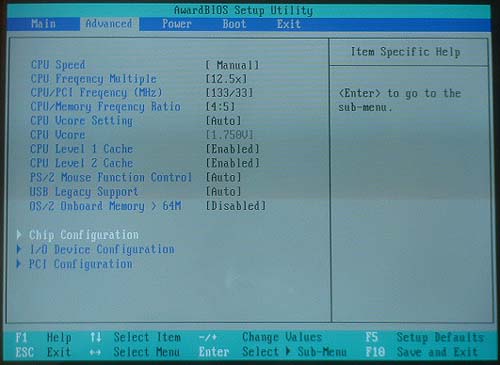
Enter the BIOS, and using the arrow keys on your qwerty board step to the right to the ADVANCED menu.... The CPU SPEED line is highlighted by default and you can see it is set to speed 1667 MHz - With that line highlighted, press the ENTER key on your qwerty board and a menu appears...
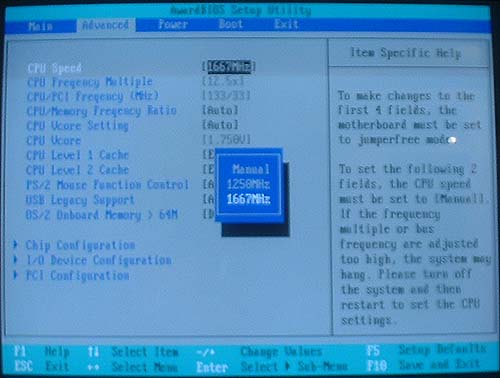
The meu appears defaulted to 1667 MHz...
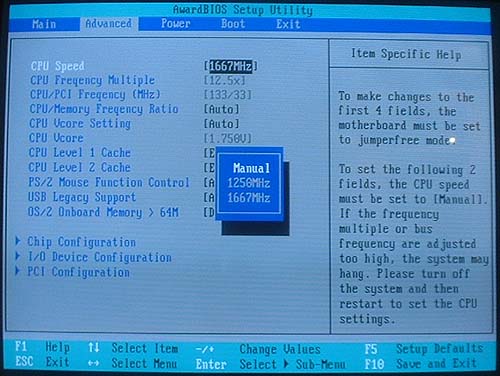
Use the arrow keys to step UP to MANUAL...
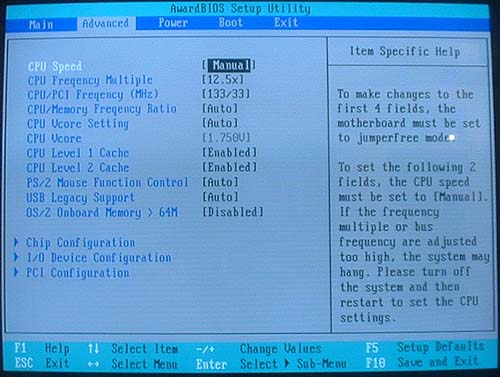
With MANUAL highlighted, hit the ENTER key again, and this sets the entry to MANUAL... You'll notice that the next 3 menu items below CPU SPEED are now 'switched on' and are no longer 'greyed-out' and unselectable...
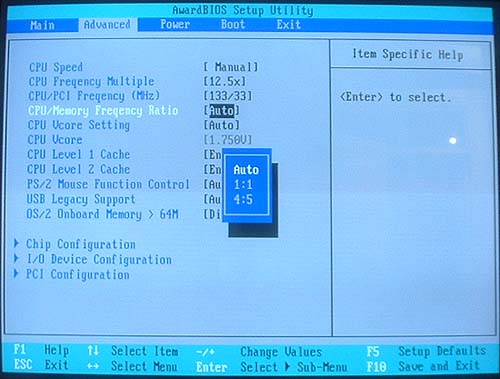
Ok... using the arrow keys, step down to the next menu item so you have highlighted the entry: CPU/Memory Frequency Ratio - This setting is currently set to default setting of: AUTO... Hit the ENTER key, and a menu appears...
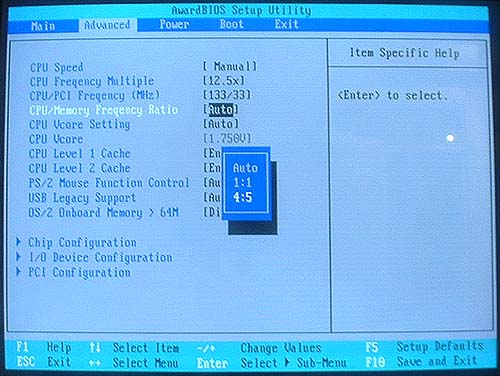
Step down the menu with the arrow keys to select the menu entry: 4:5
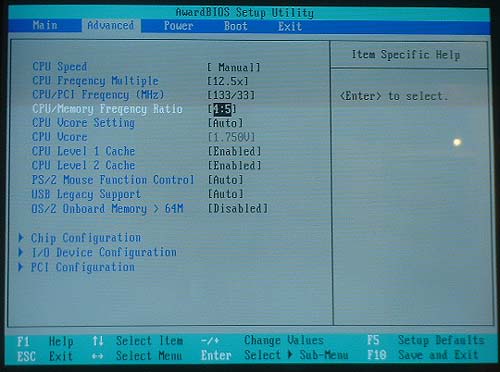
With the 4:5 CPU/Memory Frequency Ratio selected, hit the ENTER key to select this value.... The menu closes and now your screen looks like this...
NOTE: There may be one additional setting/line in your BIOS - This PC build was done last summer with a very early released A7V333 board with an older BIOS. The more recent BIOS has a TURBO setting... The Optimal/turbo settings if present should be right below the 'CPU/Mem ratio' setting... If it is NOT, then don't fret it, You have an older BIOS... I myself have never bothered to update the BIOS, it runs fine for the work this PC needs to do, so I never bothered to upgrade it. If you are a newbie following this article, I would NOT recommend you update the BIOS because it could be fraught with dangers for your PC, and you must be a newbie to be following this article anyways.
So... IF you have the Optimal/turbo settings in your BIOS, then try it set to TURBO... This 'Might' be unstable, if it causes instability, re-enter the BIOS and turn it back to Optimal....
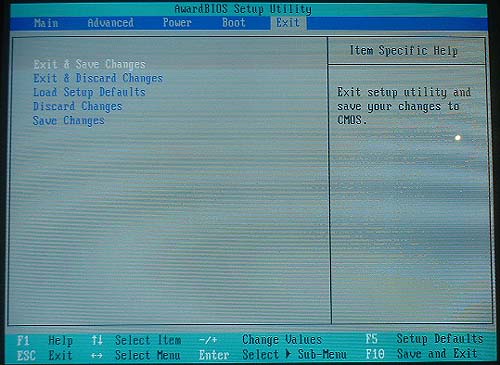
Ok... that's it... Now simply scroll across using the arrow keys to highlight the top menu: EXIT... With: Exit and Save Changes highlighted, hit the ENTER key...
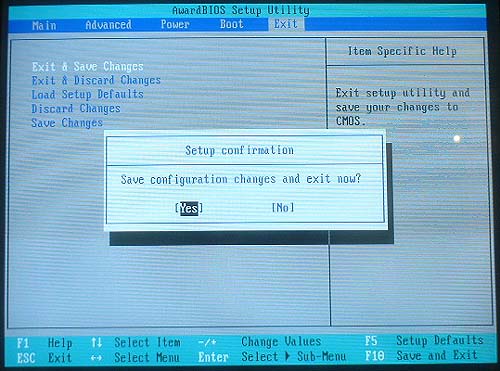
The save prompt appears.... With YES highlighted, hit the enter key to save and exit the BIOS - Your PC should now re-boot into Win XP or 98, whichever OS you installed.
FINAL STEPS - LAST BIOS TWEAKS - RAM LATENCY ETC
OK... You can try tweaking the ram latency etc to lowest figures... Again, if this causes problems just re-enter the BIOS and re-set it back - The best bet is to perform all the tweaks above for the CPU/Memory Frequency Ratio, then re-boot and checkout that the PC boots ok... If it boots ok, then re-enter the BIOS and perform these RAM latency tweaks... Re-boot and check it boots ok... Then you're ready to install the VIA 4:1 drivers
We didn't install our soundcard or audio/sequencer software yet, so we've nothing to run on our PC yet... There is further tweaks we can make. You can make these tweaks above, and these next ones at ANY TIME... So you can do them NOW, before installing your soundcard & software, or afterwards.. It doesn't matter... BUT, the VIA 4:1 driver patch needs best to be done PRIOR to adding your soundcard & music s/w.
Enter the BIOS and using the arrow keys, scroll across to the ADVANCED menu... Scroll down to the menu item: Chip Configuration - Hit the ENTER key to enter this menu section...
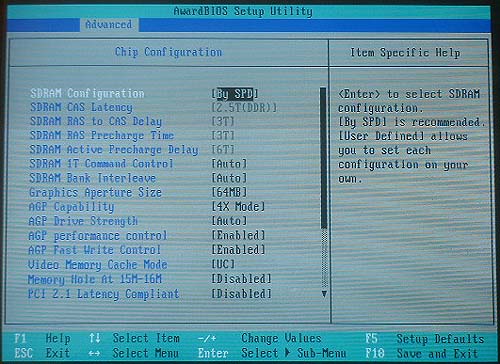
The section defaults to highlight the menu item: SDRAM Configuration, and is showing the default setting of: [By SPD]
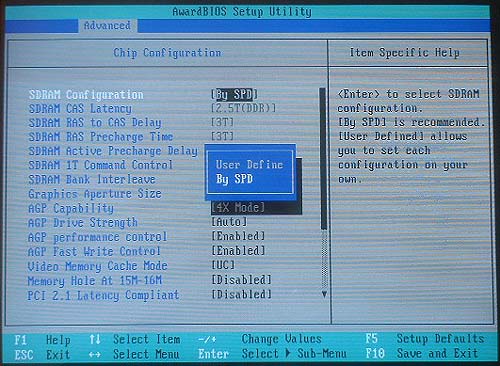
Hit the ENTER key and a sub-menu appears... Use the arrow keys to scroll up to select: User Define...
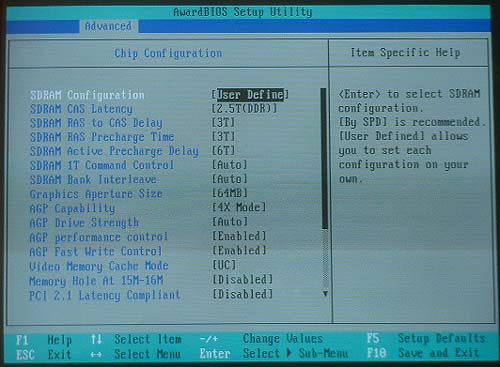
Then with User Define selected, hit the ENTER key ... The sub-menu closes and the User Define selection is made... your display now looks like this...

With User Define selected, the menu items below now change from being 'greyed-out' - You can now change these settings.... Scroll down to the next menu item: SDRAM CAS Latency and change it using the arrow keys to select: 2.0T(DDR) - Hit the ENTER key and the sub-menu closes and the display updates to show 'SDRAM CAS Latency' set to: 2.0T(DDR)...
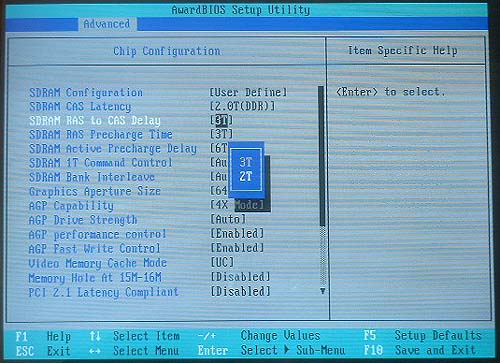
Scroll down to the next menu item: SDRAM RAS to CAS Latency - Again, hit ENTER to open the sub-menu, and select the lower figure of: 2T - Hit ENTER again to select this setting...

Again, scroll down to the next menu item: SDRAM RAS Precharge Time - Hit ENTER to open the sub-menu - Select the lower figure of: 2T - Hit ENTER to select and the sub-menu closes and our setting is now showing 2T
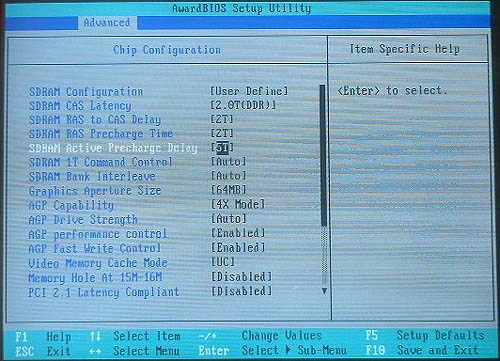
Last one now... Scroll down again to the next menu item: SDRAM Active Precharge Delay - Hit ENTER to open the sub-menu - Select the lower figure of: 5T - Hit ENTER to select and the sub-menu closes and our setting is now showing 5T
Ok... that's it... Now simply scroll across using the arrow keys to highlight the top menu: EXIT... With: Exit and Save Changes highlighted, hit the ENTER key...
The save prompt appears.... With YES highlighted, hit the enter key to save and exit the BIOS - Your PC should now re-boot into Win XP or 98, whichever OS you installed.
IF changing these RAM settings causes any problems, simply re-enter the BIOS and change the first menu item in the 'Chip Configuration' menu (SDRAM Configuration) back to the default setting of: [By SPD] - This will set all the following menu items back to default... No worries then if things go glitchy! - simply change it back again.
FINAL STEPS - VIA 4:1 DRIVER INSTALL
Ok... at this point, if you've been following the article, you now have a built PC with the BIOS tweaks done for setting the cpu/memory ratio for 2700 ram & we have tweaked our SDRAM Latency etc to the fastest settings - OR, IF SHOWING BECAUSE YOU HAVE A NEWER BIOS we have tried the TURBO setting....
Your PC should be at this point just a bare basic Windows install with no cards added except the AGP graphic's card... We now need to do a few things prior to adding our audio card.
First off we need to install our VIA chipset 4:1 drivers. This is essential as it add's stuff like Busmaster drivers etc for our disk i/o and other patches pertaining to multi-media performance.
Go to: �http://www.viaarena.com/?PageID=2� drivers section, and download the latest driver set for the A7V333 board.
VIA now have a new 4:1 driver up called Hyperion - (VIA Hyperion 4-in-1 v4.46, released 10 March 2003) - which covers all VIA boards going back to the KT133A... Your Motherboard will have a VIA 4:1 driver disk included in the box, BUT... always get the latest drivers when installing hardware, because your product most likely left the factory many many months ago, was stored in a warehouse in Korea or wherever, then shipped out to your territorial distributor where it sat in another warehouse for a while, and finaly it then arrived at a shop from where you bought it.
All product drivers tend to be out of date because of this 'chain' from the factory to your purchase, so get over to VIA and download the latest driver set... Here's some info from VIA's driver section intro - If you are running Win 98 in any of it's guises, you might be better off installing the older driver set, but don't worry, if the new Hyperion driver causes problems, it contains a full UN-INSTALL procedure, (see further down this page), so you can uninstall it and try the older one - Here's the info:
VIA Hyperion drivers are suitable for any VIA chipset and all Microsoft Windows Operating Systems (Win95/98/98SE users, see **Note below). If you are looking for VIA 4-in-1 drivers, these are the drivers you are looking for. The "Hyperion" name was added to the 4-in-1 driver set name in December 2002. This is the second release with the Hyperion name. You can find more information here. Users with hybrid chipsets (with a VIA southbridge and AMD northbridge for example) should obtain drivers from their motherboard manufacturer.
**Note: Win95/98/98SE are now relatively old operating systems, and drivers are no longer optimized for those operating systems. Many users of VIA chipsets who run Win95/98/98SE report that using an older version, such as VIA 4-in-1 version 4.35, they experience a more responsive system.
The Hyperion driver set is downloadable as a .exe file - (VIAHyperion4in1446vp6.exe) - and weighs in at about 1.3 mb, so you can download it using your current old 'net/modem-enabled' PC and transfer it to a floppy disk to port it over to your new Music PC for install.
Here's some stuff from the file about the VIA 4:1 driver patch.
Please note: The name VIA Hyperion 4in1 drivers was introduced on 6th December 2002. Before that time, VIA developed a driver package named VIA 4in1 drivers or VIA 4in1 service pack, which was essentially the same package of drivers. The VIA Hyperion 4in1 drivers continue that tradition, and have retained the version naming sequence.
VIA Hyperion 4 in 1 driver includes four system drivers to improve the performance and maintain the stability of systems using VIA chipsets. These four drivers are: VIA Registry (INF) Driver, VIA AGP VxD driver, VIA ATAPI Vendor Support Driver and VIA PCI IRQ Miniport Driver.
The VIA Hyperion 4in1 drivers automatically detect your operating system and will install only what is necessary. For your information:
VIA IDE Bus Master Driver : For Windows NT users, the VIA IDE Bus Mastering driver is the only driver to be installed in your system.
VIA Registry (INF) Driver will be installed. The driver will enable the VIA Power Management function.
VIA AGP Vxd Driver will provide service routines to your VGA driver and interface directly to hardware, providing fast graphical access.
The IDE Filter driver enables the performance enhancing bus mastering functions on ATA-capable Hard Disk Drives and ensures IDE device compatibility. (Also known as the ATAPI Vendor Support Driver)
VIA PCI IRQ Miniport Driver will be installed under Windows 98 only. It sets the system's PCI IRQ routing sequence
| Os driver | IDE Filter Driver | AGP Driver | Via Inf Driver | IRQ Driver | IDE miniport |
| Windows98 | Y | Y | Y | Y | |
| WindowsME | Y | Y | Y | | |
| Windows2K | Y | Y | Y | | |
| WindowsNT | | | | � | Y |
| WindowsXP | Y | Y | Y | | � |
VIA Hyperion 4-in-1 Driver Installation Procedure
Take the downloaded driver file, un-zip it and copy it to a floppy disk. Then take the disk over to your music PC and copy it to your hard-drive in a dedicated folder you have created for the driver. We will setup the driver patch .exe from this location, NOT from the floppy disk. (because it's way quicker for one thing)
Step 1: Close all other programs and remove any disks or CD-ROM from any drives in your computer.
Step 2: Go to the folder on your hard-drive where you saved the driver .exe file and click on the .exe file, (VIAHyperion4in1446vp6.exe)
Step 3: Bypass the "Welcome" dialog by clicking "Next"
Step 4: Next comes a read me file, which contains similar information to this installation guide. Click "Yes" to continue.
You will now be presented with the option of either a normal or quick install.
A quick install will automatically install all necessary files without presenting you with any options.
A normal install can be used to choose to un-install drivers or not install particular drivers.
Choose quick install unless you want to un-install any particular drivers or want to chose particular drivers. After the progress bar shows that the installation is complete, choose the restart option.
OR
Choose normal install if you want to un-install any particular drivers or want to chose particular drivers.
The 4-in-1 drivers will automatically detect what drivers you need and will tick or check the boxes corresponding to the necessary drivers. It is recommended that you leave these boxes as they appear, unless you are an advanced user or want to check un-install instead of install.
Step 5: Leave the default option to restart your computer and click finish. Your computer will restart to complete the installation process.
After re-boot, you'll see your pc 'detecting' various things and installing them, when it's all done, re-boot... Your VIA 4:1 driver patches are now installed!
FINAL STUFF NEEDED TO BE DONE
OK... all is done... Our OS is installed & tweaked... Our BIOS is tweaked... We now have only 3 things left to do...
- Install our soundcard
- Tweak our XP install
- Install our music software
- Format any remaining disc partitions
SOUNDCARD INSTALLATION
Follow the instructions supplied by your soundcard manufacturer - Place your soundcard in PCI SLOT 3 - That is the 3rd slot down from the AGP graphic's slot, and favoured by soundcard companies as the slot to choose because usualy this 3rd slot is UN-shared by other slots or the AGP slot.
ALWAYS download the LATEST drivers for your soundcard.. NEVER use the ones supplied in the box as these, like the VIA 4:1 drivers supplied with our motherboard, will be out of date - Go to the driver section of your soundcard manufacturer's website and grab the latest correct drivers... Download them and transfer them to your new Music PC using floppy disk if no network is available...
WIN XP TWEAKS - PRIOR TO MUSIC S/W INSTALL
You can make your XP tweaks before adding in your music software - Sure, it's tempting to rush on and add the soundcard and get going as fast as possible, but, take some time to do these tweaks cos it'll make adding your soundcard & drivers quicker and easier anyways, and probably it's best to make these adjustments first because they will alter your REGISTRY settings, and perhaps it's best to install your soundcard when these registry settings have been altered... Anyways... XP TWEAKS - I'm not going to bother writing a whole section on this because there is already great sites online dedicated to XP tweaks... Go to these site and follow the settings...
checkout musicxp.net for a list of XP tweaks for audio, and check Blackvipers pages for 'Services' tweaks which save memory and prevent un-wanted bus/disk activity... The other link is worth a read too..
www.musicxp.net
www.StreamworksAudio.com
www.blkviper.com
MUSIC SOFTWARE INSTALLATION
Again follow the instructions from the music software manufacturer... Install your music software/sequencer after the soundcard has been installed and XP TWEAKS have been done.
FORMATTING THE OTHER DISC PARTITIONS
Earlier in the article we created a bunch of partitions during the XP install... These are as yet, UN-Formatted - We need to format them so they can be used for file storage and for our working disk area.... This will require a whole seperate article add-on because I want to add a section for this with images stepping thru the procedure
We will be using this PC for music only preferably, so we want to use a special formatting to set larger cluster sizes more suitable for disk in/out operations when using larger audio files...
And the results!...
Well, after first building the PC with a Win 98SE install, I got up to about 14 tracks of audio overdubs and got bored to find things to sing about (how many harmonies can you add for a BV!!).... but that was with a deliberate over-loading of the CPU, thrashing the machine so that the CPU activity threshold in Logic Platignum was just flickering around the danger-level where the indicator changes colour (about 90% loading)....
So we overloaded the machine to max because we wanted to see if it'd record vocals/audio tracks even with a deliberately heavy backing loading, which the machine was able to do ok... so the final 'pushing the envelope' with 98SE was:
10 x waves RCL - each set to a different compression setting, some quiet radical & pumping.
1 x logic lo-pass
1 x logic parametric
1 x logic phaser
1 x logic compressor
1 x logic hi-pass
1 x logic pitchshifter II (pitchshifting a vocal up max 12 steps to chipmunk voice)
1 x gainer (to boost a track gain)
1 x logic lo-cut filter
1 x logic silver-eq
2 x logic de-essers
1 x logic fat-eq
That was all for the vocals (14 tracks of, & still able to record more passes)
The s/w instruments running were:
NI Kontact 1 - playing the upright piano sample set (very clean realistic piano as good as any top-of-the-range sampler or synth module, and a big old 88 key sample-set load-up using lots of ram!)
Kontact 2 - running the djembe sampleset.
1 x logic ESM playing bassline
1 x logic evoc ps playing a synth pad sound polyphonicaly
1 x logic ES2 playing a cycling synth pad
1 x ES1 playing a theremin patch
Those instruments have some fx too:
The ES2 has a logic multiband compressor on it.
The ESM has a logic dj-eq and logic compressor on it.
The EVOC PS has a logic multiband compressor on it too.
The Kontakt djembe has a logic Fat-eq on it.
Then there is master buss fx:
1 X logic Platignumverb doing a small ambient with predelay.
1 X timworks 4080L doing a predelay drum hall for the djembes.
1 X Tc native reverb doing a big long decay cavernous reverb with about 7 seconds decay.
1 X Logic tape-delay doing some timed delay for the drums etc...
Master out has 2 fx added:
1 x logic enhancer.
1 x logic stereo-enhancer
The above was all running at asio2 buffer of 256/5ms latency with the Hoontech DSP24/96 MKI and still capable of doing MORE audio overdubs!!
Also, with that deliberate maxing-out of the system I could STILL dial up the big Logic EVOC PS or ES2 pad synths or the Kontakt piano, stick the old foot down on the master keyboard sustain pedal and mash the keyboard to oblivion with both palms, and all that happens is the notes all sustain like crazy until the polyphony level is breached and then cut off... no glitching, no stalling, no crashing or locking up.... That test was done when the machine was running 98SE before the switch to XP.
Also the graphic's at that loading is still 100%, superfast redraws with no slowdown at all in speed of operation.
Since then I've had a remix running which used tons of stuff, about 6 Halion samplers, multiple Battery drum s/w's, tons of s/w synths and vocals, all with plenty of FX added...
Basicaly speaking this now is a budget machine... At the time of building it cost (inc' 17" flat crt screen), �520 quid!!! (without soundcard or s/w) - Now, in spring 2003, this build would cost alot less... we're talking perhaps 400 quid, a budget machine which costs the same as a decent pre-amp or multi-fx unit...
Since the build this PC has done alot of work... including some film score work, one of which was working to a floating video image sync, and it has handled all the jobs well.
So basicaly this build will guarantee to give you a robust PC with enuff power for all dance compositions - I've even used it for some tasks which were beyond the other PC's on my network, such as working thru a delimited text database file of 25,000 entries doing a batch replcement job which all the others pc's failed to even start to process without falling over!... For the price this PC is superb power/price ratio.
I set out here to do a full-on 'Build a budget PC' article, and that is accomplished, with the emphasis on 'BUDGET' !! - However, you could improve the PC... The basic fan-kit provided at the PC-Fair bundle price I paid could be definately improved upon... it could definately benefit from a quiet CPU fan which would add mebbe another 35-50 quid to the price depending how far you go in cost... For example, a Zalman 'Flower' cooler would be just under �50 quid I think... This would in no way be a performance booster, but I just say this so that you know that you can spend a bit more in the future to quieten the PC down a bit... If it somes to that, you could also add a quiet power supply as well!... it's up to you
Since the initial build using 98SE, I've gone on to change the OS to WIN XP... Using XP, the PC uses a bit more ram resources, and it'd be fair to say that 98SE offered a tad, only a tiny bit, but it did offer a bit more headroom than XP.
However, XP is such a stable OS compared to 98, that i think it's worth getting it for the stability. All you'll sacrifice is a few extra s/w FX you could run...
ADD-ON 7/5/03 - Been using the machine again today, and all last week... Really, it's always in use, and I must admit, since buying UT2003, I was tempted to play some LAN mash-up's during breaks with co-writers !!.. so I installed that... (VERY nice game btw!)
PROJECT5 and SONAR 2.2 have also been installed as well as REASON 1.1 & Cubase SX - all with the latest updates... We've also added REAKTOR3 & ABSYNTH as well as a few other indie plugs.... now after 8 months or so workload, this PC is still running along fine, However, I have to spend some time doing clean-up duties soon to free-up the D: audio work drive Partition....
If you DEFINATELY do NOT intend to add games like UT2003 - which took a HUGE chunk of the C: disk, and you do NOT intend to run 3 extra major sequencers as well as REASON or PROJECT5, Fruity-Loops and other app's like that, then 5Gb for your Primary C: drive is PLENTY for a music PC...
However... IF you DO plan to add lots of major s/w app's on top of your music software of choice, then make a bigger Primary C: Partition.... 8-10 Gb would be better then so you still have that sorta 'reserve' 3Gb or so free on C: at all times, even after adding mebbe 5 or 6 other major app's.
I'm getting so into this PC it has to be said... It's the most powerful I've built, and was a BIG leap in power from my previous test/work machine... I rarely use my outboard now either with so much power to just add as many synths, samplers and drums plus FX as I can desire!...
However... recently, I started to use a few outboards and a new Studiomaster mixer with the outboard rig... The STudiomaster has it's 8 sub-groups/busses wired to the 8 IN's on the ST-Audio ADC/DAC2000 rack...
All I can say is, for songwriters who require an 'all-in-one' box (add a mic & Cans/monitors & master-keyboard) for full-on backing production.... or for dance people ... requiring lot's of instruments and also a handful or mebbe 16 or 24 tracks of audio too... This machine abso-frickin-lutely rocks!...
I'm amazed something this cheap can give such facilities at your fingertips - The mad thing now is, the bloody s/w easily outcosts the hardware!!.. it's bonkers!... using the s/w synths & samplers etc is just like triggering your modules in the rack from your keyboard... real-time.
Anyways, I'm getting into this 'all-in-one' thing soooo much and using so much less hardware (I got about 15 synths & an 8ft rack I think), I'm thinking of adding two flat screens to get more screen estate - man if you added a hardware controller!!!... Logic, SX, VST, Sonar etc, they all work with 'em now... imagine! - definately I'm going that way now for sure...
But I'd never get rid of the hardware tho :) -
Happy building... if you try it - If anyone needs any help, mail: admin@dancetech.com
If you can get to central London, and are a 1000% total newbie and want some help, fine.... mail us...
You'd have to go out and get all the components and bring them round, but if you are really scared to fuck it up, like it's your first build or something, then come over & we'll help you build it if you like...
You do the work!... but there's help and DSL at hand for all the latest drivers etc, we'll just put it on the network after the boot-up and you can set it all up with some help and get any drivers you need... Go home with a working box!
- Article Section 1 - INTRODUCTION, PARTS, THOUGHTS, ETC
- Article Section 2 - THE PHYSICAL PC BUILD PRIOR TO FIRST TEST BOOT-UP
- Article Section 3 - FIRST BOOT-UP INTO THE BIOS + ADD DRIVES
- Article Section 4 - BOOT TO BIOS, DETECT DRIVES - Final tweaks prior to O/S install
- Article Section 5 - WIN XP O/S INSTALL - 'Plug & Play' & 'Standard PC' installs
- Article Section 6 - WIN XP O/S Tweaks - Final BIOS ram & cpu/mem/ratio tweaks
COMMENTS FOR:
'Build a Music PC - XP2000 - super-cheap!! [pt6] 'There are a total: 2 comments posted to this page.
Name: micha
Email:
Activity:
Date: 11-Jun-03
great audio-pc-installation- guide.Lots of work, as it seems and very worthy for me. Thanks a lot
| Article rating out of 5: |
Article 'ratings' were added September 2008, so most articles have no viewer rating
Last added comment
Name: Matt
Email:
Activity: Hobby-ist
Date: 06-Apr-05
I've just read through your 'build a music PC - XP2000' which i found quite amazing... very well written, well done. But my main reason for reading it was to get info on fitting a secondary hard drive which I'm pretty sure you say you're going to explain later in the article but I don't think it gets covered. Is this something that got forgotten or am I going mad or perhaps did I miss it?
I will definitely use this as a guide if I ever build my own unit, but at this moment in time I'm struggling with adding another drive to my system....
thanks in advance and cheers for the info... very helpful.
| Article rating out of 5: |
Article 'ratings' were added September 2008, so most articles have no viewer rating
'Build a Music PC - XP2000 - super-cheap!! [pt6] '
Note: To cut down on spammers, cookies must be enabled to post comments to this page.
[back to top]