Build a Music PC - XP2000 - super-cheap!! [pt4]
Ask a question about this subject?
Post a question direct to our forums and get mailed when a reply is added!
There are 2 viewer comments posted to this page - Read
Author: admin
Date: 12-Feb-03
Build a budget 2000 Athlon XP music PC - Page 4 - Final BIOS tweak before OS setup.
Ok... We've added our hard-drive (physical drive) and our CD-ROM drive and our Floppy-drive... We now need to boot up again into our BIOS and make sure all these drives are functioning & are detected by the PC BIOS... Then we do a few more tweaks and we're ready to install our Windows Operating System (OS)
Now... When you first boot up aftert adding the hard-drive & CD-ROM, the PC might bypass the BIOS and try to boot off the hard-drive - That's doubtful, but it might... usualy what happens is the first time you boot with the drives added, it'll boot into the BIOS automaticaly because the BIOS didn't yet have a chance to automaticaly detect the added drives yet...
IF the boot bypasses the BIOS and tries to boot from the newly added hard-drive, you'll see this screen error message....
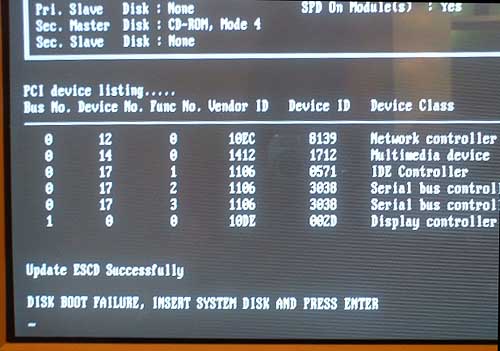
If it does that, simply hold down keys CTRL ALT & then press DEL... The PC will re-boot... At reboot, hit the DEL key when prompted to enter the BIOS....
If the PC boots into the BIOS normaly (or if you hit DEL to enter the BIOS), you'll see the MAIN bios screen....
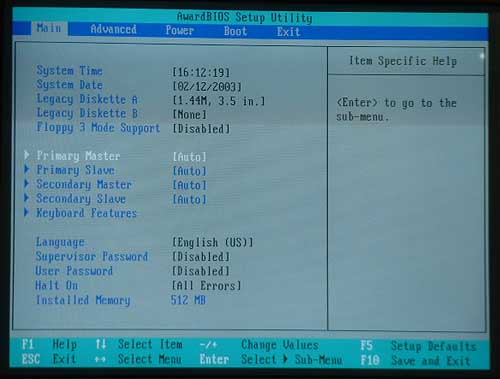
Using the 'up/down left/right' arrow keys, scroll down until Primary Master is highlighted in white text - (it should be set to AUTO remember from our first BIOS boot up when we set things the first time)
Now with Primary Master highlighted, hit the ENTER key and the BIOS shows the drive it has detected in the Primary Master slot....
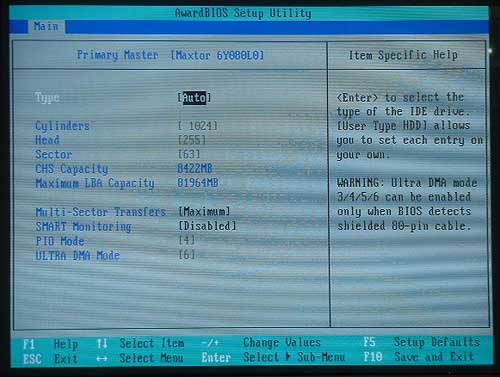
You can see it has detected the 80gb Maxtor drive just fine, and shows it's spec's - PIO mode 4 - Ultra DMA mode 6 - The drive has a maximum LBA (logical block address) size of 8422 Mb
Ok hit the ESC key to backout of that screen and back to the main BIOS screen - You'll see now that the slot for Primary Master now shows the Maxtor drive (or whatever model you have used).....
Now scroll down using the arrow keys and highlight the Secondary Master....
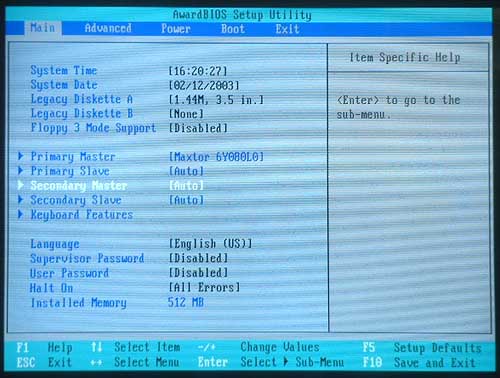
again with Secondary Master highlighted, hit the ENTER key and the BIOS shows the drive it has detected in the Secondary master slot....In this case it's our CD-ROM drive...
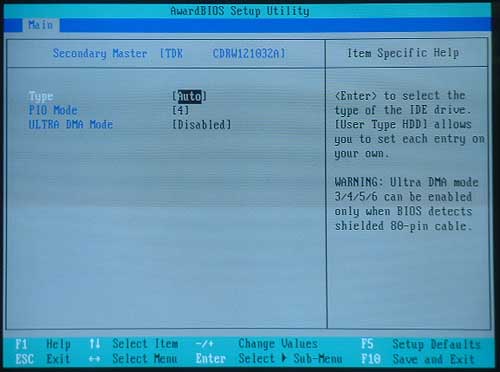
There she is!... a TDK cd-rom which has PIO mode 4
Step back to the main BIOS screen using the ESC key and now both drives show in their respective Primary & Secondary master IDE slots...
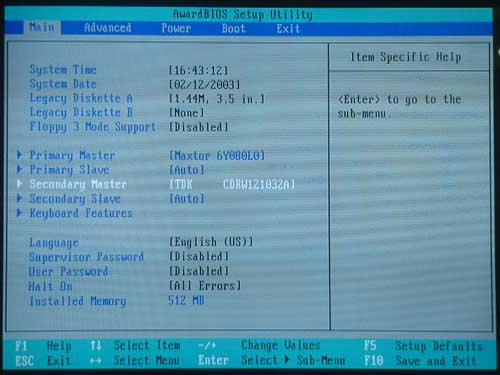
Ok so our drives are detected now and show up ok..... Let's do a couple more BIOS tweaks and we can now get on with installing our Windows OS...
One thing we can do now is turn OFF the Primary & Secondary IDE slots in the BIOS - We're not using them at the moment as we only have our hard-drive in the Primary MASTER slot and our CD-ROM in the Secondary MASTER slot - So we can turn off both the Primary & Secondary SLAVE slots....
To do that start by using the arrow keys to highlight the Primary Slave slot....
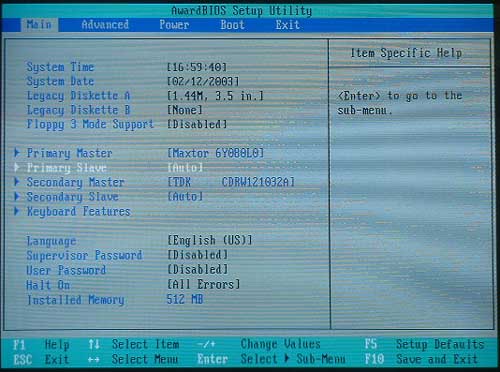
Hit the ENTER key and enter the details page for the Primary Slave slot...
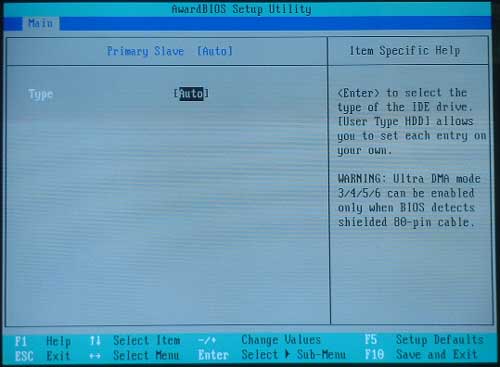
As you can see... there's nothing listed, it just says AUTO - Hit the ENTER key to open the menu.... This screen appears...
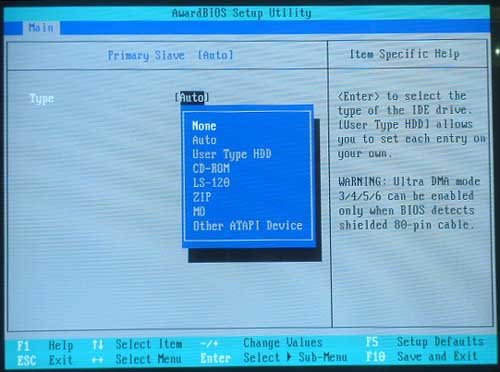
Use the arrow keys to scroll up and select NONE and then hit the ENTER key again... Now the Primary Slave slot is set to NONE...
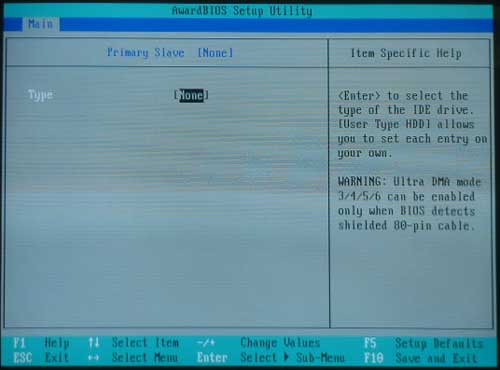
Ok... Hit the ESC key to backout of that screen back to the main BIOS screen....
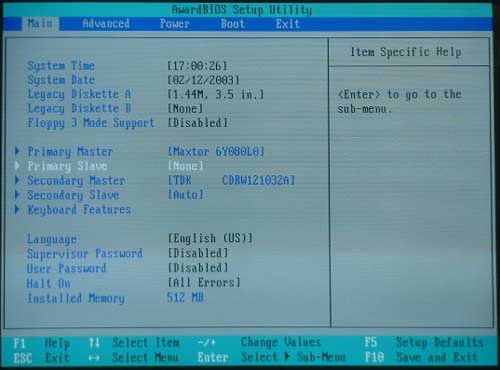
You can see now back on the MAIN bios screen, the Primary Slave slot is now set to NONE....
Repeat the same procedure for Secondary Slave slot and when you get back to the MAIN bios screen, both Primary & Secondary SLAVE slots now show 'NONE' - Like this...
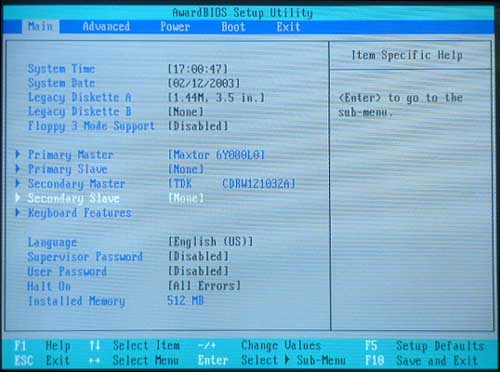
Now hit the F10 key (or scroll accross using the arrow keys to the EXIT menu), and choose SAVE SETTINGS & EXIT - make sure the 'Y' is selected (for 'yes') and hit enter to save your settings.... The PC will shutdown and start to re-boot - to stop it doing so, simply hold down the power on/off switch on the case front for about 4 seconds and the PC will shut off completely...
Ok... that's the lot!!.... We are now finaly ready to install Windows... I'm going to make the Windows install pages as two seperate pages.. One for XP and one for 98 because both are different.... Stay tuned, that'll be done in the next few days...
Next Article Section - WIN XP O/S INSTALL - 'Plug & Play' & 'Standard PC' installs
- Article Section 1 - INTRODUCTION, PARTS, THOUGHTS, ETC
- Article Section 2 - THE PHYSICAL PC BUILD PRIOR TO FIRST TEST BOOT-UP
- Article Section 3 - FIRST BOOT-UP INTO THE BIOS + ADD DRIVES
- Article Section 4 - BOOT TO BIOS, DETECT DRIVES - Final tweaks prior to O/S install
- Article Section 5 - WIN XP O/S INSTALL - 'Plug & Play' & 'Standard PC' installs
- Article Section 6 - WIN XP O/S Tweaks - Final BIOS ram & cpu/mem/ratio tweaks
COMMENTS FOR:
'Build a Music PC - XP2000 - super-cheap!! [pt4]'There are a total: 2 comments posted to this page.
Name: andrian manahan
Email:
Website?: none
Activity: Hobby-ist
Date: 16-Mar-07
this site is very very helpful. it's detail is really clear and easy to follow. thanks to the one who created this website.
| Article rating out of 5: |
Article 'ratings' were added September 2008, so most articles have no viewer rating
Last added comment
Name: pardeep
Email:
Website?: disk boot file
Activity: Professional
Date: 06-Jan-09
hai how r u my computer disk boot files
sir
| Article rating out of 5: |
Article 'ratings' were added September 2008, so most articles have no viewer rating
'Build a Music PC - XP2000 - super-cheap!! [pt4]'
Note: To cut down on spammers, cookies must be enabled to post comments to this page.
[back to top]